Long story short, after a year of experiments with homelabbing, I finally was ready to set up a “production” homelab server. This is a machine I consider the main, stable, and reliable server, running self-hosted apps and services of the same quality.
Even though I already have chosen a specific set of apps I want to run on this server, there is still a question of accessing my data from outside my home network, and a question of doing it in a secure and convenient matter, using SSL-protected domain names instead of unprotected port access.
The first issue, accessing data from the outside world, was solved by Tailscale. It just works, and if I ever feel I don’t trust them anymore, there is always Headscale, self-hosted version of it.
The second issue was a lot more unclear to me, and it clicked in my head only recently, and that’s what I’ll be talking about in this post.
So, I have a server with Docker on it, a few Docker containers running my apps I currently access in a crude and mundane matter of typing, say, 192.168.0.20:2286 to access my photos in the browser. In no way is this convenient, IP address is subject to change in the event of changing router, and I hate to remember ports.
Here’s what we’re going to need to get to the result of accessing my photos by typing photos.mydomain.com:
- Tailscale network
- A Cloudflare account
- A domain name
- A few commands to type into terminal
Tailscale
I use Tailscale on all my homelab machines, my Macbook, and my iPhone. It allows me to access any self-hosted apps at home any moment. That will be the first step: setup Tailscale network. It’s free up to up to 3 users and 100 devices, which is plenty for a family of two, even three.
Tailscale assigns internal ip address to each device inside its network. We’re going to need the Tailscale ip address of your home server in the next step.
Cloudflare
If you still don’t have a Cloudflare account, it’s time to create one. We’ll be using it to manage DNS servers of our domain and create SSL certificates automatically and for free.
After signing in to Cloudflare, go to YourDomain.com->DNS and click “Add record”. Add a record of type A, put * into Name field, and the internal ip address of your home server from the previous step into IPv4 address field. Don’t forget to disable “Proxy” toggle. The record will not be saved with an error if it is enabled and the ip address is not reachable from outside the internet anyway.

Now, go to your profile (“My profile” on the top right of the page), then API Tokens and hit the “Create token” button. You need to create a custom token with the following properties:
Zone, Zone, Edit Zone, DNS, Edit (might work with Read instead of Edit, actually)
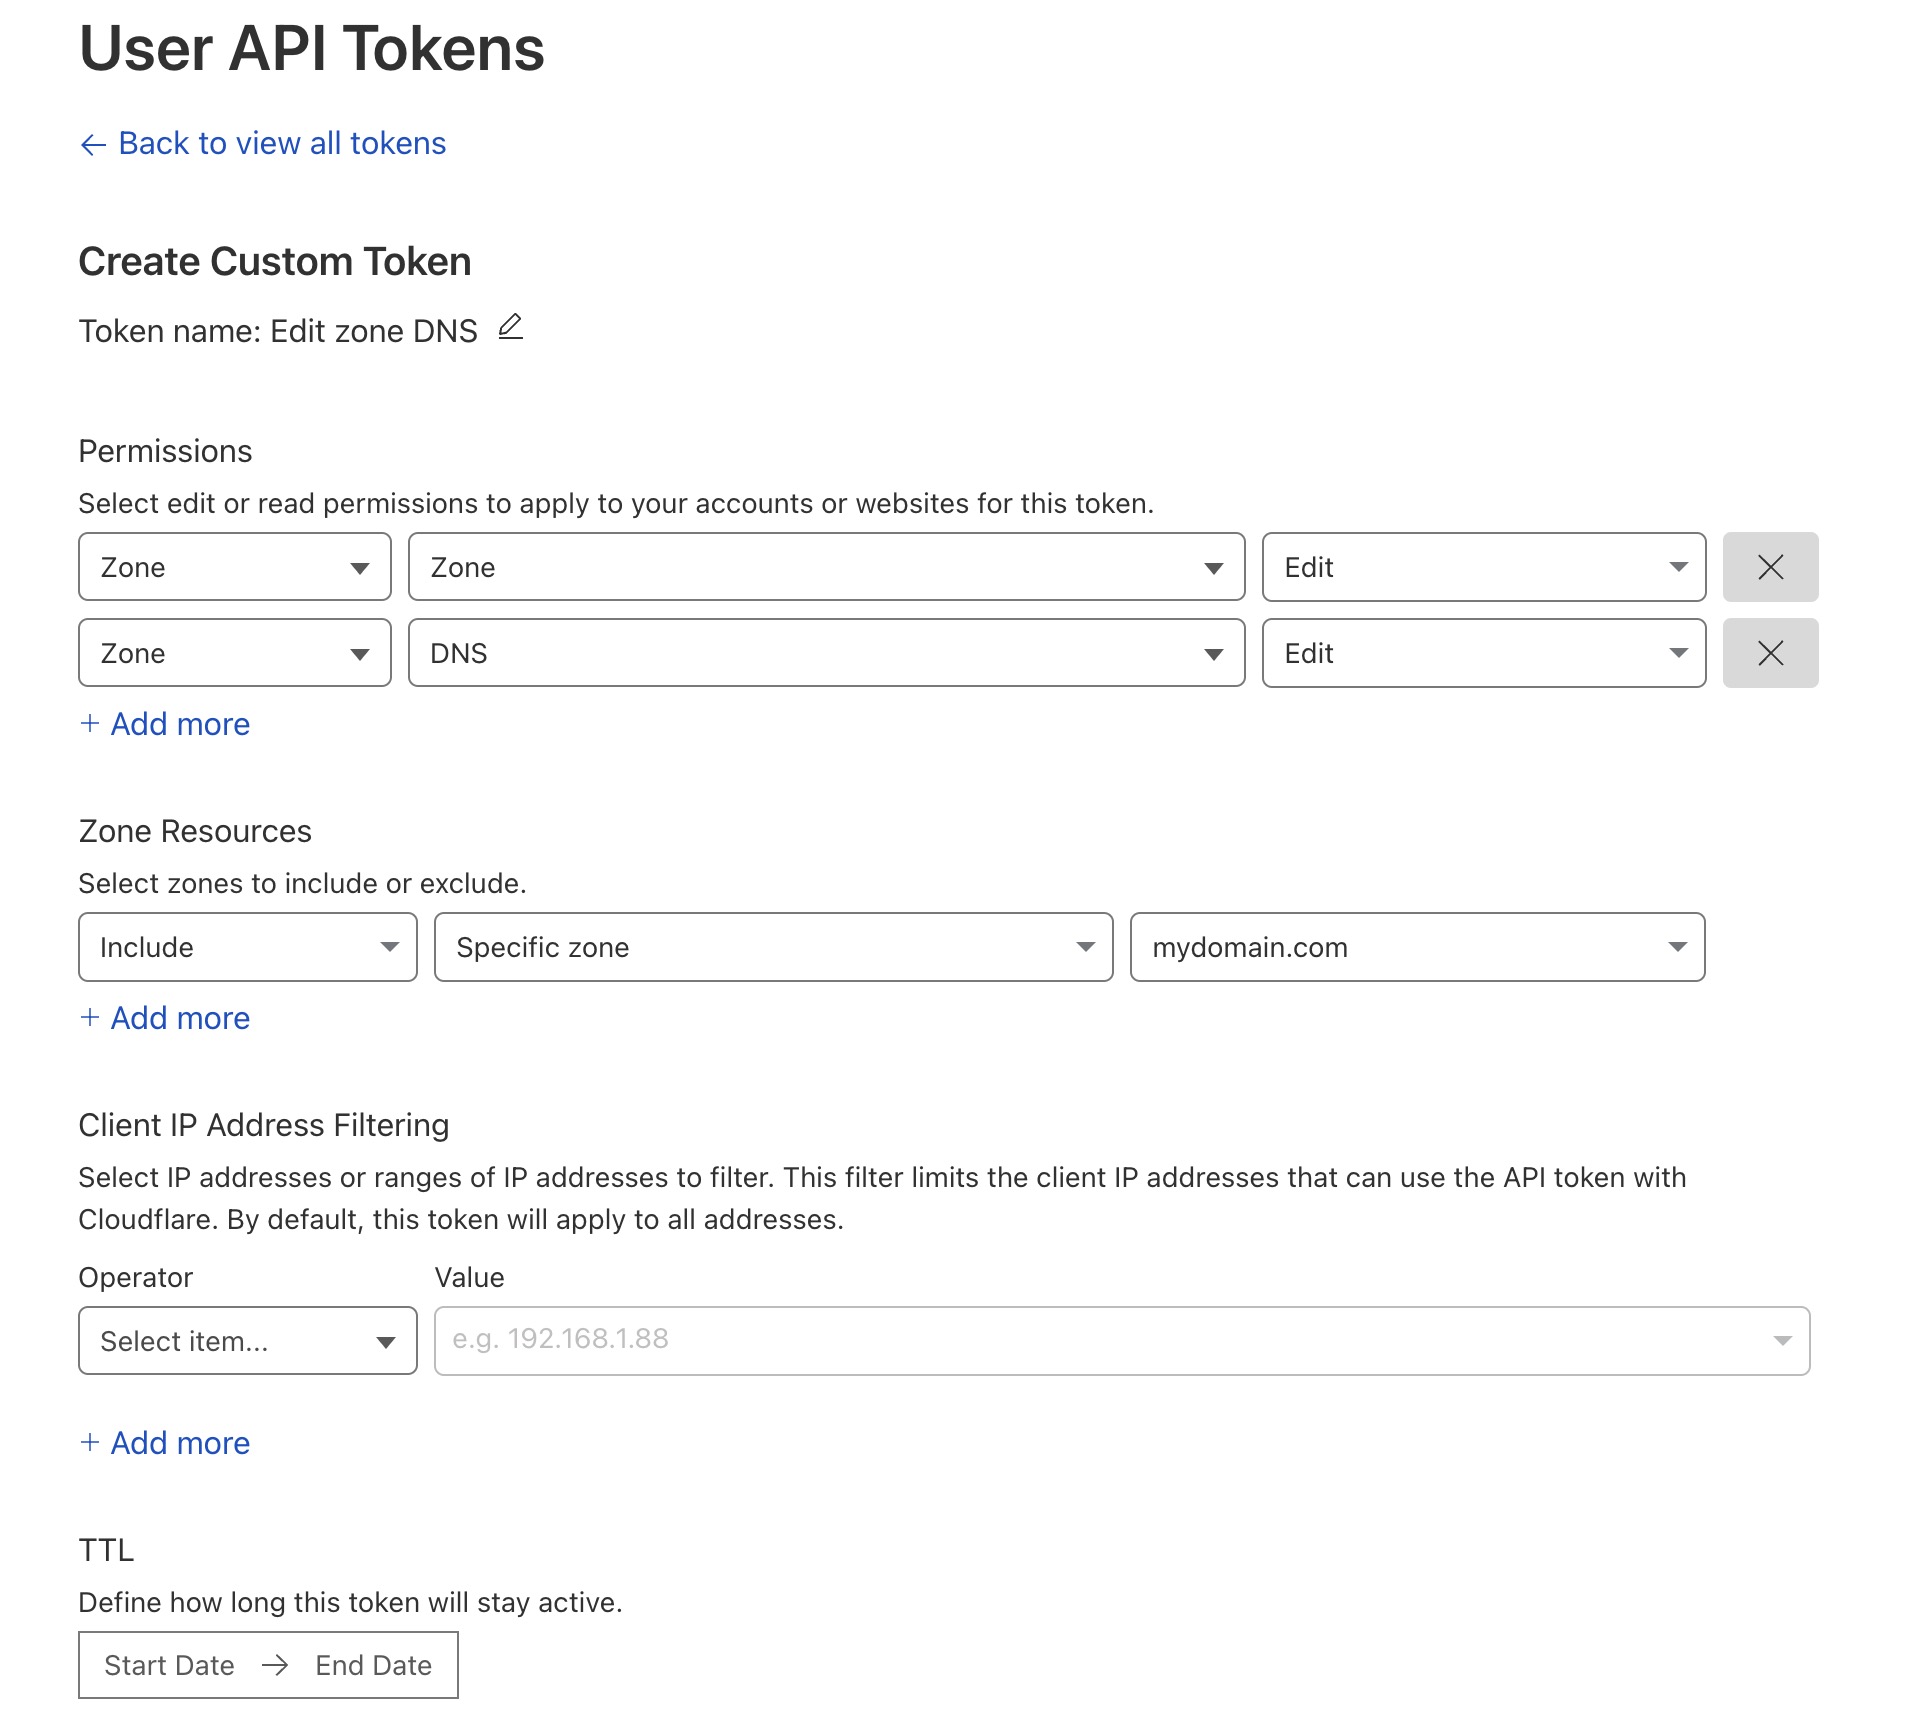
In Zone Resources select Include, Specific zone, and select domain you want to use to access your homelab resources.
Don’t forget to copy the token value you just created, we’re going to use it to configure the automation of getting SSL certificates.
Reverse Proxy
I’m used to using Nginx as my main reverse proxy, but this time I went all-in for Caddy, a somewhat more modern reverse proxy. The main selling point for me was that it is able to work with Cloudflare to obtain SSL certificates automagically.
I run Caddy in docker, so we’re going to need at least 4 files:
- Dockerfile, to specify the way we want to build Caddy Docker image
- docker-compose.yml, so we wouldn’t need to remember all the commands to run Caddy
- container-vars.env for environment variables
- Caddyfile, do configure Caddy the Reverse Proxy itself.
Create a directory on your server, say, /home/user/apps/caddy, and create all 4 files in there.
Below you can find the contents of each of them, read the comments inside:
Dockerfile
ARG VERSION=2

FROM caddy:${VERSION}-builder AS builder

# We need this plugin to obtain SSL certificates from Cloudflare
RUN xcaddy build \
	--with github.com/caddy-dns/cloudflare

FROM caddy:${VERSION}

COPY --from=builder /usr/bin/caddy /usr/bin/caddy
docker-compose.yml
version: "3.9"

services:
  caddy:
    build: .
    container_name: caddy
    hostname: caddy
    restart: unless-stopped
    ports:
      - "80:80"
      - "443:443"
      - "443:443/udp"
    networks:
      - caddynet
    env_file:
      - container-vars.env
    volumes:
      - ./Caddyfile:/etc/caddy/Caddyfile:ro
      - ./data:/data
      - ./config:/config
      - /var/run/docker.sock:/var/run/docker.sock

networks:
  caddynet:
    attachable: true
    driver: bridge
container-vars.env
# Replace values with your own

MY_DOMAIN=mydomain.com
MY_HOST_IP=100.100.100.100
CLOUDFLARE_API_TOKEN=CLODFLARE_API_TOKEN_VALUE
Caddyfile
# myapp.mydomain.com {
#	reverse_proxy containername:3000
#	tls {
#		dns cloudflare CLOUDFLARE_API_TOKEN
#	}
#}
Let’s take a closer look at Caddyfile. At the moment, its content is commented and should be replaced with real values, but we’ll be back to it a bit later. For now, just leave it as is.
When you created all the files, you can start Caddy:
docker compose up -d
Now, we want to run an app, that will be accessible by something like myapp.mydomain.com, when you are connected to your Tailscale network.
I’ll demonstrate how it could be done, using glances as an example. Somewhere on your server, create another docker-compose.yml file for it:
docker-compose.yml
version: '3'

services:
  monitoring:
	container_name: glances
    image: nicolargo/glances:latest-alpine
    restart: always
    pid: host
    volumes:
      - /var/run/docker.sock:/var/run/docker.sock
    environment:
      - "GLANCES_OPT=-w"

networks:
  caddy_caddynet:
    external: true
Note the networks section: we will need to add caddy_caddynet as an external network to every docker-compose.yml file of any app we want to be accessible using subdomains. Also note, that we don’t expose any ports. Glances default port is 61208.
Updating Caddyfile
Now, we need to update the Caddyfile, so Caddy would know what we want to expose, on which subdomain, and how exactly it could connect to it.
Set Caddyfile’s content to the following, and don’t forget to replace the domain name and Cloudflare api token value to a real ones:
Caddyfile
glances.mydomain.com {
	reverse_proxy glances:61208
	tls {
		dns cloudflare CLOUDFLARE_API_TOKEN_VALUE
	}
}
And we’re done!
Note, that we’re using glances as a hostname in reverse_proxy directive, and internal port 61208. This is because we’re using the same network for Caddy and Glances, and Caddy can resolve the hostname of the container to its internal ip address.
All we need to do is restart Caddy (replace path to docker-compose.yml with your own):
docker compose -f /home/user/apps/caddy/docker-compose.yml restart
Now, if you are connected to Tailscale, wait 20-30 seconds so Caddy can handle SSL certificate questions with Cloudflare, and then just open https://glances.mydomain.com in your browser.
You’re beautiful! It might not work, but you still are. If it isn’t working, check logs of your Caddy container to indicate the error.
Conclusion
This is the way I handle accessing my homelab-hosted apps from basically anywhere. There is a more convenient way where you don’t need to update Caddyfile manually every single time you want to host a new app, and use labels in docker-compose.yml of said app instead, but, unfortunately, https://github.com/lucaslorentz/caddy-docker-proxy uses LetsEncrypt’s SSL certificates, and LetsEncrypt needs to actually reach (sub)domain it creates certificate for. This is, in the case of an internal network and a Tailscale network, not an option, because those networks by definition are not accessible from the big and wild internet.
For now, I “solved” this inconvenience by automating uploading of updated Caddyfile using Ansible, but I’m sure, there are other options I’m currently unaware of.
The main thing, for me is that it just works and does what I need it to do: a) serving my self-hosted apps in a b) secure way with c) subdomains and d) for free.
Cheers!
Highly inspired by:
- https://samedwardes.com/2023/11/19/homelab-tls-with-caddy-and-cloudflare/
- https://helgeklein.com/blog/automatic-https-certificates-for-services-on-internal-home-network-without-opening-firewall-port/
- https://dev.to/jhot/caddy-docker-proxy-like-traefik-but-better-565l